Docker is defined as
A set of platform as a service products that use OS-level virtualization to delivery software in packages called containers
In essence Docker allows us to turn applications into binaries which can be stored externally and then be pulled to run or deployed anywhere. It was initially released in 2013 (8 years ago from now) and is predominantly written in Go. The two main public registries of docker images are Docker Hub and Docker Cloud. The former being the default registry Docker checks.
This is part of my "under-the-hood of" series:
- Git
- GraphQL
- Web bundlers (e.g. Webpack)
- Type systems (e.g. TypeScript)
- Test runners (e.g. Mocha)
- NPM
- Source maps
- React hooks
- Apollo
- Auto formatters (e.g. Prettier)
The article today will be broken down into:
1: Overview
There are several components to Docker, lets start with:
- Client
- Registry
-
Host
- Daemon
- Images
- Containers
- Storage/volumes
- Networking
Client
The client is the means to interact with a Docker Host via the Daemon (see below). The client usually consists of a CLI (to run the commands directly e.g. docker pull x) or a piece of software which runs these connads for you (e.g. Docker Desktop).
The client can actually connect to more than 1 Docker daemon at a time.
Registry
This is the external database which stores the images. See my "under the hood of NPM" for more details on a registry Database.
Host
This is the environment to execute and run containers on, its not the same as the local machine. To get access you have to go into a container and then hit localhost:<port>.
The host includes several objects such as:
Daemon
The Daemon is a background process whose job is to listen for Docker API requests and respond to them. It manages objects like - images, containers, networks and volumes.
The binary can be run under
dockerd
Example - build command
- CLI tells Deamon
- Damon opens
Dockerfilerunnning 1 instruction at a time - It commits the result of each instruction to a new image - Finally outputs ID of image - Uses the build cache. Print message in CLI with each step
Build cache
- For each instruction Daemon checks cache to see if exists already
- Pairs "parent image" + "instruction" (key) to find a hit
- Compares the instruction against all child images derived from base/parent images
Images
There is alot to images so I have tried to cover the main points.
Images are read-only templates, they are immutable snapshots.
Images come with a manifest.json file, which holds details of the image tags and signatures.
The image directory contains the image layer and manifest, only 1 layer per image. The base has no parent, the children have the ID of the parent. The bottom-most image is called the base image. The unique ID is a sha256 hash
Image layers
Layers are intermediate images, an image has 1 layer, each layer is an instruction. The instruction is stored inside the images JSON config, along with the folder details (i.e. lower, merged, upper, work). This system promotes smaller images as each is stacked on top of the previous.
Each layer is stored in its own directory, inside the Docker host local storage area. The directory contains (unique) image contents, but the directory name IS NOT the layer ID.
> ls /var/lib/docker/overlay2 # list image layers
> 16802227a96c24dcbeab5b37821e2
> ls 16802227a96c24dcbeab5b37821e2 # image layer contents
> diff link lower merged work
Directories
- link - shortened layer id
- diff - the layers contents from the root (the folders and files)
- lower - Points to parent/previous layer (higher layers have this).
- merged - Unified contents of higher layer and itself (higher layers have this)
- work - used internally by OverlayFS storage driver
You can use the below commands to verify the cryptographic IDs
> docker image ls
> docker history
Use the below to view the layer ID and hte instruction which created it (note Size can be 0 if just adding to metadata)
> docker image history <image>Containers
Containers are the virtualized runtime environment, they run the image.
Container layer
Each new container adds a new writeable layer on top of the underlying layers. All changes made to the running container (e.g. alter file) are written to this thin writeable layer. When the container is deleted so is this writeable layer, the underlying image is untouched. Multiple containers can share the same image but have their own data state.
If a volume is used the volume becomes this writeable layer.
Storage/volumes
I personally find this the trickiest one to understand from the Docker subject.
Storage driver
This controls how the "image layer (stack)" and "container (r/w) layer" are managed (the contents), unrelated to volumes.
Generally files are not persisted after a container is deleted, but the driver gives the ability to write data to the "containers (writeable) layer". The driver handles details of how the image layers interact with each other. They have different advantages and disadvantages based on the situation.
All drivers use the same stackable image layers and most use the CoW (copy-on-write) strategy (see below).
The overlay2 docker storage driver uses the OverlayFS Linux kernel driver (see below).
The storage driver uses the backing filesystem driver (in the kernel) to alter files (the filesystem of the host on which Docker is installed). Some storage drivers only work with specific backing file-systems e.g. extfs.
Copy-on-Write strategy
It is a very efficient storage technique. Essentially if the image is duplicated but not modified, don't create a new image. So you can share images until one is changed, but modifications create a new image.
OverlayFS
OverlayFS layers 2 directories on a single Linux host and presents them as a single directory. Is is a very modern union filesystem (i.e. container vs image layer) and it has efficient inode utilization.
Volumes
Volumes are used to persist data created in containers, for write-heavy applications. They are preferable to bind mounts, as volumes are managed by docker whereas bind mounts are via the OS.
To use a volume point local contents to the area used by the container and using the below format.
volume:directoryVolumes are bind-mounted into existing (or created) paths within the filesystem image, outside the image layer. They are preserved in their source location and become the "container layer". They can share data by sharing a single volume across multiple containers.
They are created initially and then re-used, managed via the Docker API. You can create and manage them outside the scope of a container. You can name the volume so it has a source from outside the container, or have it anonymous so when the container is removed the Daemon will remove it.
They live on the host filesystem (usually found under the docker data directory e.g. /var/lib/docker/volumes but depends on FS).
Some useful commands:
> docker volume create my-vol
> docker volume inspect my-vol
> docker volume rm my-vol
>  -v ./packages/website:/usr/src/app
Networking
The docker Deamon acts as a DHCP service for containers i.e. assigning IPS etc. The container uses DNS settings of the host (defined in /etc/resolv.conf).
The default network settings specify the container is part of the docker network stack and creates a bridge (a gateway and IP subnet). All containers that belong to this network can talk to each other via IP addressing.
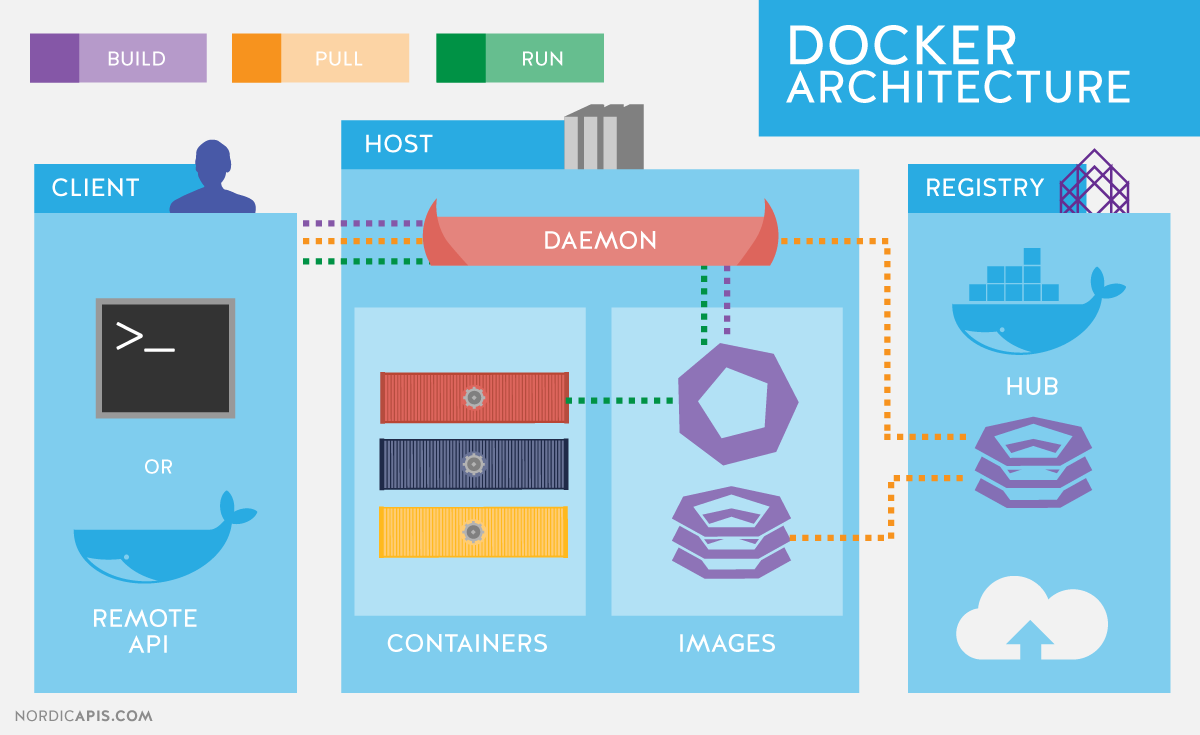
My favourite Docker architecture image is this one - it shows an overview of the components but also the flow of operations (see the build, pull, run).
2: Building our own Docker
For this proof-of-concept we will be including the below aspects:
My plan was to use a copy-on-write mechanism and custom JS storage driver, but I ran out of time and decided it was more important to focus on the image creation and running aspect.
So our app is going to:
- Read a local
Dockerfilecommitting instructions into a new image layer, based off a parent layer, creating a new image. - Run the new image - use a
tmpdirectory as a writeable container layer over the specified image. Then start our container in a virtualized runtime environment and execute a command.
Ignored aspects:
- Daemon acting as DHCP for containers assigning ips
- Host to run Daemon (will be on local machine)
- Deleting container layer when stopped
- Container layer using stackable "copy-on-write" strategy
- Allow mounting volume
- Container not using DNS settings of the host (no host)
A final thing which was omitted is that in real Docker each instruction creates a new image layer, in our PoC we have run all the instructions into a single image layer, hopefully this does simplify things.
THE CODE !!
Daemon
The Deamon is a simple express server executing commands in a child process.
import express from "express";
import path from "path";
import { promisify } from "util";
import run from "./commands/run.js";
import build from "./commands/build.js";

const app = express();
const port = 3000;

app.get("/:command/:args", async (req, res) => {
  console.log("Command: ", req.params.command);
  console.log("Args: ", req.params.args);

  switch (req.params.command) {
    case "run":
      await run(req.params.args);
      break;
    case "build":
      await build(req.params.args);
      break;
  }
  res.send("success");
});

app.listen(port, () => {
  console.log(`Example app listening at http://localhost:${port}`);
});
Existing images
Before we look at the commands, I have created a couple of fake image layers inside images.
To summarize what is found in the above link:
images/lowest-layer contains:
-
/diff
- contains folders /etc, /home, /lib, /mount, /opt, /user, /var
-
link
- contents
LOWEST-ID
- contents
-
config.json
- JSON object with empty values
- manifest.json
images/middle-layer contains:
-
/diff
- contains folders /media + /usr/src/app
- Note that /usr/src/app now has a small JS application with
index.prod.jsandindex.dev.js
-
/merged
- contains folders /etc, /home, /lib, /mount, /opt, /user, /var, /media
- /media is new
-
link
- contents
MIDDLE-ID
- contents
-
lower
- contents
l/LOWEST-ID
- contents
-
config.json
- JSON object with values for
Env,CmdandWorkingDir - Cmd runs
index.dev.js
- JSON object with values for
- manifest.json
CLI
const daemon = 'http://localhost:3000';
const supported = ['build', 'run'];

async function run() {
  const command = process.argv[2];
  const details = process.argv[3];
  if (!supported.includes(command)) {
    console.log("Not supported");
    return;
  }
  const response = await fetch(`${daemon}/${command}/${details}`);
  if (response.status) {
    console.log("SUCCESS");
    return;
  }
  console.log("Failure :(");
}

run();
It is very simple. It takes an argument and some details and HTTP GET's the Daemon with those details. The HTTP GET mechanism is a simplification of the real CLI->Daemon communication, but it works easily for a PoC.
Our cli package script will just run node cli.js.
Example commands are:
> npm run cli <command> <argument>Commands
Build
We start with some utils, they return paths or update config values.
const utils = {
  getFullPath: () => path.resolve(path.dirname("")),
  grabConfig: async () => {
    await delay(1000);
    const fullPath = utils.getFullPath();
    const fullConfig = await import(`${fullPath}/tmp/config.json`);
    return fullConfig.default[0];
  },
  updateConfig: async (config) => {
    const fullPath = utils.getFullPath();
    return asyncWriteFile(
      `${fullPath}/tmp/config.json`,
      JSON.stringify([config])
    );
  },
};
The main build fuction.
export default async function (buildImage) {
  // 1
  if (buildImage === ".") {
    // Default local image
    // 2
    const dockerFilePath = path.resolve(path.dirname(""), "./OurDockerfile");
    const file = await asyncReadFile(dockerFilePath, {
      encoding: "utf-8",
    });
    // 3
    // good for small files, NOT big ones
    const linesArray = file.split(/\r?\n/);
    await linesArray.map(async (line) => await commitLine(line));
    // required for above OS ops to finish
    await delay(1000);
    // create new image
    const layerName = "highest-layer";

    const fullPath = utils.getFullPath();
    // 4
    // update link (HIGHEST-LAYER) + lower (MIDDLE-ID)
    const link = await asyncReadFile(`${fullPath}/tmp/link`, {
      encoding: "utf-8",
    });
    await asyncWriteFile(`${fullPath}/tmp/link`, layerName.toUpperCase());
    await asyncWriteFile(`${fullPath}/tmp/lower`, link);

    console.log(`SUCCESS - Created layer: ${layerName}`);
    await delay(1000);
    // 5
    // move tmp to new image
    await asyncNcp(`${fullPath}/tmp`, `images/${layerName}`);
    // remove tmp
    await asyncRimraf(`${fullPath}/tmp/`, {});
  }
}
It works like this:
- Checks for build image, currently only supports local file i.e.
. - Grab the
OurDockerfilecontents. - Split the file by its lines and run
commitLineto process each line - Update the
linkandlowerof the new image, the references to itself and parent image. - Move the new image layer from
/tmpinto/imagesand remove/tmp
The commit maps job is to action the comamnds inside the Dockerfile. In real Docker it would create a new layer for each instruction. There is also a commitLine which runs against the map. It currently supports some of the most popular commands in Docker:
- from
- env
- workdir
- copy
- cmd
const commitMap = {
  from: async (layer) => {
    // move to tmp for processing
    const fullPath = utils.getFullPath();
    await asyncNcp(`${fullPath}/images/${layer}`, `tmp`);
    // remove diff as specific to layer
    await asyncRimraf(`${fullPath}/tmp/diff`, {});
  },
  env: async (values) => {
    const config = await utils.grabConfig();
    if (config.Config.Env) {
      config.Config.Env.push(...values); // merge incoming array into config one
    } else {
      config.Config.Env = values;
    }
    await utils.updateConfig(config);
  },
  workdir: async ([value]) => {
    const config = await utils.grabConfig();
    config.Config.WorkingDir = value; // a string
    await utils.updateConfig(config);
  },
  copy: async (values) => {
    const fullPath = utils.getFullPath();
    const cpyLoc = values.pop();
    // required for diff deletion to finish
    await delay(1000);
    values.map(async (file) => {
      // create folder recursively
      await asyncMkdir(`${fullPath}/tmp/diff${cpyLoc}/`, { recursive: true });
      // copy files
      await asyncCopyFile(file, `${fullPath}/tmp/diff${cpyLoc}/${file}`);
    });
  },
  cmd: async (values) => {
    const config = await utils.grabConfig();
    config.Config.Cmd = values;
    await utils.updateConfig(config);
  },
};

async function commitLine(line) {
  const args = line.split(" ");
  // 1
  const command = args[0];
  if (!command) return; // empty line or something
  args.shift();
  // 2
  // call command function
  if (!commitMap[command.toLowerCase()]) return; // invalid instruction
  await commitMap[command.toLowerCase()](args);
}
The break down the flow once commitLine(line) is called
- Grab the command
- Make sure it exists in the
commitMapthen execute it with arguments
If we take the following OurDockerfile
FROM middle-layer
ENV NODE_VERSION=13.0.0
WORKDIR /usr/src/app
COPY fileA.txt fileB.txt /usr/src/app
CMD npm run start.prod
Note that fileA.txt and fileB.txt both exist at the top level of the test repository and have simple content inside.
We can step through how each instruction gets processed:
FROM
- gets the full path
- moves the image (e.g.
middle-layer) located inimagesintotmp - removes the
tmp/difffolder as it is specific to the layer
I have 2 example images already build under images
- middle-layer
- lowest-layer
ENV
- Grab the config
- if there are values set under
Envadd to them, else create the section and add this value - Update the config
WORKDIR
- Grab the config
- Set the
WorkingDirto be the new value - update the config
COPY
- Grab the copy location
- Map over each file to copy and move to
/tmp/diff/<copy location>
CMD
- Grab the config
- Set the
Cmdto be the new value, i.e. runindex.prod.js - update the config
Notice the similarities between ENV, WORKDIR and CMD. They are mostly updating the image layers config.json file, so when it is run it has the correct values.
In real Docker each of the instructions would be committed into a new image layer and at the end the image would be created, however we have merged those 2 concepts for simplicity sake so that all the instructions create a single image layer.
Run
Now we will look at what it takes to build a new image.
export default async function (image) {
  // 1. copy image contents, exclude configs
  const fullImgPath = path.resolve(path.dirname(""), "./images");
  await asyncNcp(`${fullImgPath}/${image}/merged`, `tmp`);
  console.log("copied");

  // 2. process config
  const fullConfig = await import(`../../images/${image}/config.json`);
  const config = fullConfig.default[0].Config;
  const splitCommand = config.Cmd;
  // env is key:value pairs
  const environment = config.Env.reduce((acc, curr) => {
    const [key, value] = curr.split("=");
    acc[key] = value;
    return acc;
  }, {});
  const workingDir = config.WorkingDir;

  // 3. run command in child
  const startCmd = splitCommand[0];
  splitCommand.shift();
  const childProcess = spawn(startCmd, splitCommand, {
    cwd: `tmp/${workingDir}`,
    env: environment,
  });
  // 4. outputs
  childProcess.stdout.on("data", (data) => {
    console.log(`stdout: ${data}`);
  });
  childProcess.stderr.on("data", (data) => {
    console.error(`stderr: ${data}`);
  });
  childProcess.on("error", (error) => {
    console.log(`child process error ${error}`);
  });
  childProcess.on("close", (code) => {
    console.log(`child process exited with code ${code}`);
  });
  // remove ref might close open conn, but not sure it will considering above
  childProcess.unref();
}
Lets review
- We move the images
mergedcontents intotmpfor processing - We process the
config.jsongrabbing the values we need such asCmd,WorkingDirandEnvfor the environment variables. - Spawn a child process and run the command using the working directory given and the environment variables
- Create listeners on events such as stdout and error. Logging the output.
Running the app
To test we will perform the following
- Run middle-layer -> runs tiny js app which prints
run DEV app - Build a new highest-layer images -> creates
images/highest-layer - Run highest-layer -> the same tiny js app except runs
run PROD app
Lets go 💪
In terminal A we run below starting the Daemon
> npm run daemonIn terminal B we run our other commands.
Run middle-layer image
> npm run cli run middle-layer- Built with command
npm run start.dev - Outputs
run DEV app. Check
Build highest-layer image
> npm run cli build .Run highest-layer image
> npm run cli run highest-layer- Built with command
npm run start.prod - Outputs
run PROD app
So thats it 🙌, our mini Docker works.
Thanks so much for reading, I learnt a huge amount about Docker from this research and I hope it was useful for you. You can find the repository for all this code here.
Thanks, Craig 😃